5 DIY Patio Tips to Build Your Backyard Paradise
We talk a lot here about making your backyard entertaining area your own. The point is to feel really at home in your space, with and without guests. The happier the host is, the easier it will be for guests to feel the same.
And what better way to bond with the very ground you walk, sit, and toss horseshoes on than to create your own DIY patio? Living in the information age means that if you don’t know how to do something but want to try, you can probably find a tutorial on it fairly easily. And in the case of DIY patios, that is 100% the case.
As it turns out, the concepts involved in building a DIY patio are delightfully simple. If doing a lot of your own work on your property excites you, you’re going to enjoy making your patio. Below are some tips to keep in mind while you do your research and as you get started on the work.
DIY Patio Tip #1: Make it Bigger
Before doing anything else, take some time to stand in your backyard in silence, just surveying the territory. What kind of a place are you working with? What options does your yard lend itself to? As you Indulge your imagination; daydream about what this place might look like when you’re done. If we’re going to take on a big project like this, let’s make it something great, right?
The most important question is what do you plan to do on your patio? Do you plan to have a lot of outdoor seating? Does it need to be big enough for a dining table? Fire pit? Barbeque? Make it big enough that it can handle everything at once. This is how to make sure you’re never cramped and that all the people on one side of the table don’t have to set their chairs on grass or, worse, straddle the edge of the patio. If it turns out bigger than you ever need, the extra-spacious feeling will make everybody feel more relaxed.
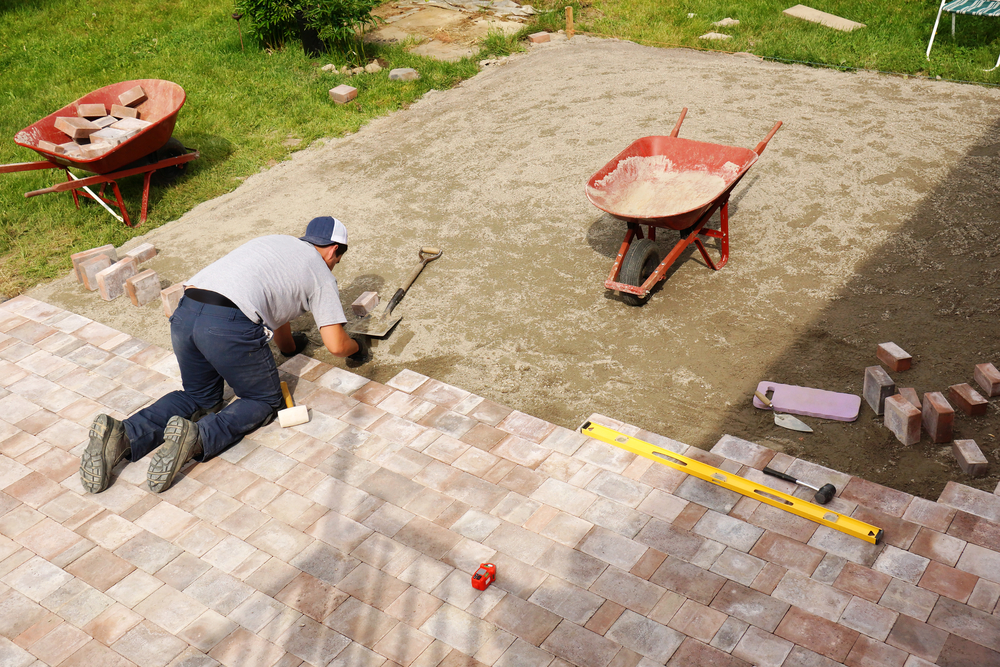
DIY Patio Tip #2: Levelness is Next to Godliness
Most of the work of a DIY patio is preparing the ground and laying the base. You have to cut out a slab of earth, pour gravel, pour sand on top of the gravel, and make sure it all stays level.
Now, if you cut any corners (don’t), just make sure none of them are how level your base is before the pavers go down. If the base isn’t absolutely level, your beautiful, exciting DIY patio will come out uneven. That means tripping hazards galore until you redo the whole project.
In fact, if you hire outside help for anything, their first priority should be helping you make and keep a level base for your patio’s surface.
DIY Patio Tip #3: Source Your Surface
Speaking of the surface, laying a beautiful one is what all this prep work is for, right? So take your time finding your favorite pavers to lay down. Don’t settle for whatever happens to be available at your local Home Depot (unless you happen to like what they have, of course). You’re your own contractor and with the whole internet at your fingertips, you can source some truly extraordinary pavers if you find that you want to.
It might even be a good idea to have the pavers delivered at the beginning of the project. That stack of stones, tiles or whatever, just waiting to be called upon, might provide an extra bit of inspiration to get this project done!
DIY Patio Tip #4: Clean Off the Polymer
When all the pavers are laid, you’ll be almost done. Next, it’ll be time to fill in the spaces between pavers with sand. Chances are you’re going to use a special polymer sand that was designed for this kind of job. The advantage of polymer sand is that when you spray down your patio and get the sand wet, its adhesive properties are activated and it acts as a sort of glue, holding the patio in place.
That’s why you absolutely must be completely sure that you have cleaned all the sand off the surface of every paver, while everything is still dry. Once you spray, that polymer will be stuck. This is one of those steps it’s ok to get nit-picky about and even to pay professionals to help with if you need it.
DIY Patio Tip #5: Plan to Resand Your Pavers as Maintenance
You don’t have to use polymer sand, though; you can use the regular kind. The reason to use regular sand–besides the fact that it’s cheaper–is because polymer sand chunks after a few years. Essentially, it wears out before your patio does and starts flaking away. Obviously, this leads to loose bricks and faster deterioration of your work. Worse yet, just adding more polymer on top won’t fix it. You’ll have to wait until you can’t stand it any longer and redo your DIY patio.
On the other hand, regular sand only erodes slowly over time and can be added to. If you use regular sand as your binder, just plan to buy a few bags of it every summer so you can resand your pavers as routine maintenance; it’s like getting the lawn mower serviced or getting the flower beds ready for planting. It’s a small job–usually less than an hour, depending on square footage–and it makes the patio look like it was laid yesterday again. And you don’t have to stress about how clean the pavers are!
Get Going–Build Your Paradise!
There is nothing like building something yourself to enjoy at home for years to come. Backyard patio spaces often take time to evolve into the paradises that they end up being because it takes time to experiment–but through all that trial-and-error and all those gatherings with friends along the way, the DIY patio that you built will be supporting you. That’s a great feeling.
Just remember to take your time and plan the space before you do anything that can’t be undone. And once you’ve gotten started, the most important thing is levelness. If your leveling efforts aren’t working out the way you hoped, there is nothing wrong with being your own DIY contractor and hiring someone with the tools and skills to make sure your patio’s base will support a level patio.
And finally, at the end, think about which type of sand you want to bind the pieces together with. Maybe you’ll find some kind of newfangled polymer sand that doesn’t chunk; maybe you’ll decide it’s better to stick to the classics and just plan to re-sand once a year. Each entails different maintenance schedules. Choose your destiny carefully!
Whatever you do and however you do it, have fun! This is going to be an awesome space. And the sooner you get started, the sooner you can begin arranging and rearranging patio furniture, barbecuing, and sharing the space with your friends!